
API Documentation
API Response
Overview
Response for BitForms lets an automation service send a response back to a submitted form. This guide explains the required and optional parameters, provides JSON examples, and shows how to configure an automation workflow.
How form submission works
When a form is submitted, the webhook payload includes a return URL, session_id, and form_id. Your automation uses the return URL as the destination for an HTTP POST request and includes the identifiers and message data in the JSON payload.
Required parameters
Include these parameters in the POST payload:
| Parameter | Description | Required |
|---|---|---|
| session_id | Unique identifier for the submitted session. | Yes |
| form_id | Unique identifier for the form. | Yes |
| body | Message body. Include it even when its display is disabled. | Yes |
| body_display | Set to “yes” to show the body, or “no” to hide it and show the default message. | Yes |
Example 1: Minimum JSON response
{
  "session_id": "example_session_id",
  "form_id": "7",
  "body_display": "yes",
  "body": "Your Body Text Here"
}Replace the example session and form IDs with the values supplied by the form submission. The example above also removes the trailing comma found in the original example so the JSON is valid.
Optional parameters
Add the following parameters to control links, images, PDFs, and copy functionality:
| Parameter | Default | Description |
|---|---|---|
| link_url | Not set | URL to use for a clickable link. |
| custom_link_text | Not set | Optional label replacing the default “Visit Link” text. |
| copy_button | “no” | Set to “yes” to show a button that copies the message body. |
| image_url | Not set | Image information; the original documentation describes an object containing an html property. |
| pdf_url | Not set | URL of the PDF to display or link to. |
| has_link | “no” | Set to “yes” to display a link. |
| has_image | “no” | Set to “yes” to display an image. |
| has_pdf | “no” | Set to “yes” to display a PDF link or embedded PDF. |
Example 2: Display a PDF
{
  "session_id": "example_session_id",
  "form_id": "7",
  "body_display": "no",
  "pdf_url": "https://example.com/sample.pdf",
  "has_pdf": "yes"
}This example hides the body and enables a PDF display. The source example omits body even though the required-parameters section says it must be sent. For an actual integration, include a body field as well.
Example 3: Display a link with custom text
{
  "session_id": "example_session_id",
  "form_id": "7",
  "body_display": "no",
  "link_url": "https://example.com/sample.jpg",
  "custom_link_text": "Click here to view image",
  "has_link": "yes"
}This enables a link with custom text while hiding the body. As above, include body in production requests because the required-parameters section specifies it.
Configure your automation
You can use FlowMattic or another automation tool capable of sending an HTTP POST request. Although the interface differs between platforms, the data being sent is the same.
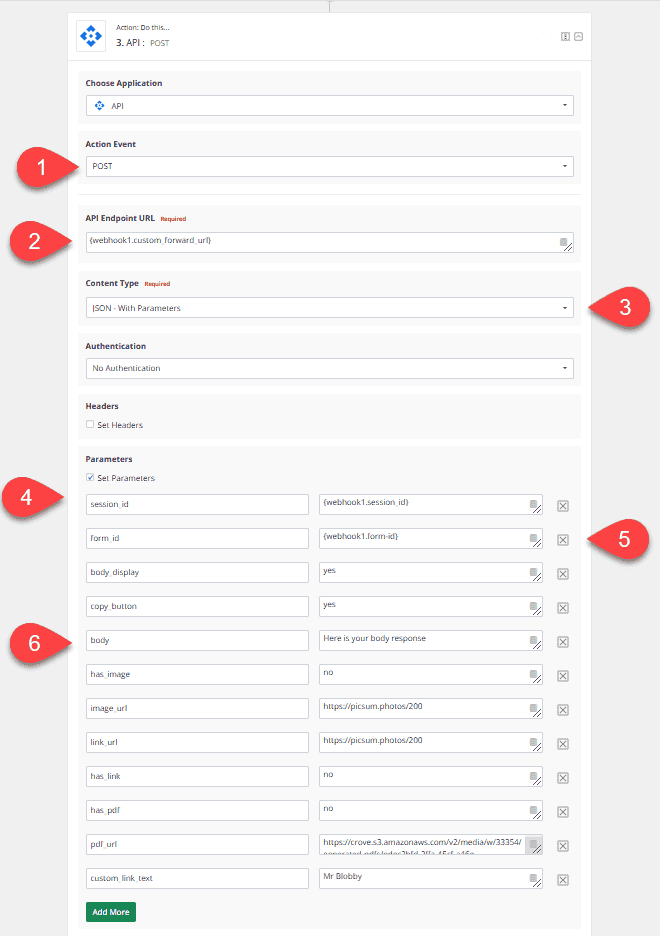
- Create an HTTP POST action in your automation.
- Map the return URL received from the form submission to the request endpoint.
- Choose a JSON request body and map the required parameters.
- Map
session_idfrom the initial webhook payload (for example,responsefsf_67559df047c388.08927290). - Map
form_idfrom the same submission. - Supply a
bodymessage even when settingbody_displaytono. - Add optional parameters as needed, then test with a real form submission.
Example response endpoint
https://domain.com/wp-json/responsefsf/v1/receive-responseThe URL above is illustrative. Use the return URL supplied in the webhook payload rather than hard-coding the example domain.
Implementation notes
The JSON examples show the parameter names and sample values from the documentation. The original page does not specify authentication, status codes, or the exact structure of the image object; confirm those details within your installation when needed.